Git & GitLab Workflow: Branch Management and Local Workflow
This guide establishes the standard development practices for writing code, managing local versions, and saving your work within the MineTwin codebase. Proper local version control ensures that your experiments are safe and your contributions are cleanly packaged before they reach the rest of the team.
1. Branch Management Strategy
A branch is an independent, isolated line of development. Think of it as a personal, safe "sandbox" copy of the project where you can build and break things without affecting the live application.
1.1. The 'Main' Branch
The main branch acts as the "Source of Truth" for our stable, production-ready code.
-
Rule #1: Never, ever write code directly on the
mainbranch.
1.2. Feature Branches
For every new task, bug fix, or experiment, you must create a uniquely named "feature branch."
-
Naming Convention:
feature/issue-[issue-number]-[short-description](e.g.,feature/issue-42-login-fix) -
Why: This isolates your changes. If your code breaks, you simply delete the branch without affecting the stability of the
maincode.
|
A Note on Git GUI Clients
While the step-by-step instructions below specifically demonstrate the workflow using GitHub Desktop, there are many other excellent Git User Interfaces (UIs) available. Popular alternatives include GitKraken, Sourcetree, TortoiseGit, or the built-in version control tabs within IDEs like Eclipse and VS Code. Regardless of which tool you choose to use, the underlying Git principles and the overall lifecycle (fetch, branch, stage, commit, push) remain exactly the same. |
1.2.1. Creating a Feature Branch in GitHub Desktop
-
Ensure your current branch is set to
main. -
Click Fetch origin to ensure you have the latest code.
-
Click the Current Branch dropdown at the top of the window.
-
Click New Branch and enter your branch name using the convention above.

|
The Golden Rule of Branches
Always click 'Fetch from origin' in your Git client before starting any work. This ensures your local environment is synchronized with the latest remote changes and prevents merge conflicts. |
2. The Development Loop (Local Workflow)
This is the "do it live" cycle. Follow these steps every time you work on a task:
-
Edit: Write your code in your IDE (e.g., Eclipse).
-
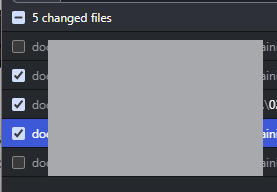
Stage: Open GitHub Desktop. It will automatically detect your saved changes. Review the files in the left panel and check the boxes next to the files you want to include in this specific update (staging).
-
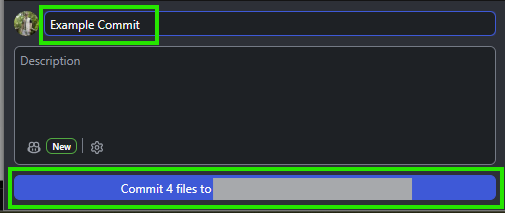
Commit: A commit is a saved snapshot of your staged files. Write a clear, descriptive commit message in the bottom left panel.
-
Best Practice: Use the imperative mood (e.g., "Add queue redirection", not "Added…") and reference the issue number if applicable.
-
-
Push: Click the Push origin button. This securely backs up your local branch commits to the remote GitLab server.

3. Common Pitfalls & Troubleshooting
Git is powerful, but it can be unforgiving if you misunderstand its core mechanics. Here are common issues developers face and how to resolve them.
3.1. Committing is NOT Backing Up
A common mistake is thinking your work is safe just because you clicked "Commit." A commit only saves the snapshot to your local hard drive. If your computer crashes, your work is gone. Your work is only safe once you hit Push, which sends that local commit to the remote GitLab server. Rule of thumb: Push your code at the end of every workday.
3.2. Accidentally Working on 'Main'
You started coding and realized you forgot to create a feature branch, and you are currently editing files directly on main.
The Fix: Do not commit! As long as you haven’t committed, most Git UI tools (including GitHub Desktop) will allow you to simply create a new branch right then and there. The tool will ask if you want to "bring your changes to the new branch." Say yes, and crisis averted.
3.3. Throwing Away Bad Experiments
If you wrote some code, broke everything, and haven’t committed yet, you don’t need to manually undo your typing. The Fix: In GitHub Desktop, you can right-click any changed file (or all of them) and select Discard Changes. This instantly reverts the files back to exactly how they looked at your last commit.
3.4. The "Nuclear Option" (I Messed Up My Local Repo)
Sometimes you might make a bad commit, accidentally merge the wrong branches locally, or get your local repository into a broken state that you don’t know how to fix. The Fix: If you have not pushed your broken changes to the remote server yet, your safety net is the server. You can simply delete your entire local project folder from your computer, and re-clone the repository from GitLab. (Note: This is a brute-force method and you will lose any unpushed work, but it guarantees you are back to a clean, working state.)
4. Prepare Your Branch for Merge
In the next section we will explain the online side of the Git workflow, starting with merge requests. But before submitting your Merge Request, it is critical to integrate the latest changes from the main branch into your feature branch. This practice, often called rebasing or merging main into your branch, ensures that your changes are compatible with the current state of the project and helps resolve any potential conflicts locally, rather than during the MR review process.
-
Update from Main: In GitHub Desktop, ensure you are on your feature branch. Click on the
Branchmenu and selectUpdate from main(orMerge into current branch from main). This will pull the latest changes frommainand integrate them into your current branch. Resolve any merge conflicts that arise during this step.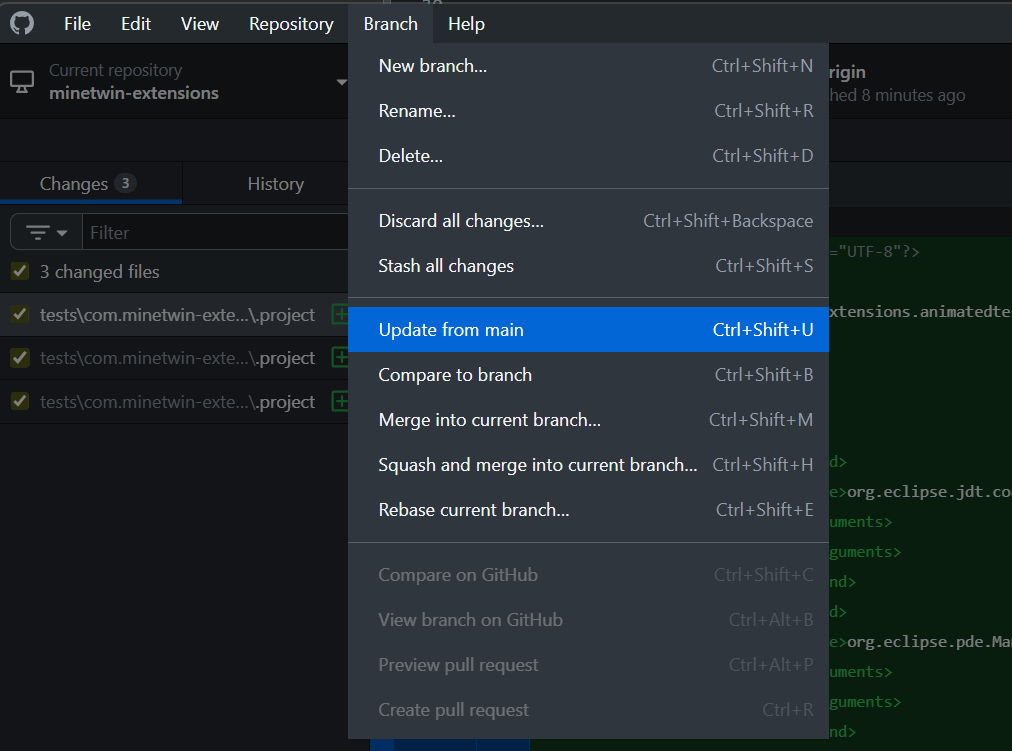
-
Verify Local Changes: After updating from
mainand resolving any conflicts, it is imperative to re-run your local tests and ensure that your project still compiles and functions correctly. This step validates that the integration ofmaindid not introduce any regressions. -
Push to Origin: Once you have successfully updated your branch from
main, resolved any conflicts, and verified that everything works locally, push your changes to the remote repository. In GitHub Desktop, click thePush originbutton, typically found in the top middle-right section of the interface. This makes your updated feature branch available on GitLab, ready for the Merge Request.