UI Integration & Toolbar Implementation
With your command and handler defined in the previous module, the final step is to expose this functionality to the user by integrating it into the MineTwin toolbar.
|
Starting Point
This section builds on the content from Introduction to Custom Commands and Handlers. |
1. Navigating the UI Model
We will insert the new import button into the primary toolbar area. Open Application.e4xmi and follow this path in the Model Explorer:
-
Windows > Trimmed Window > Trim Bars > Trim Bar – Top > Toolbar (First)
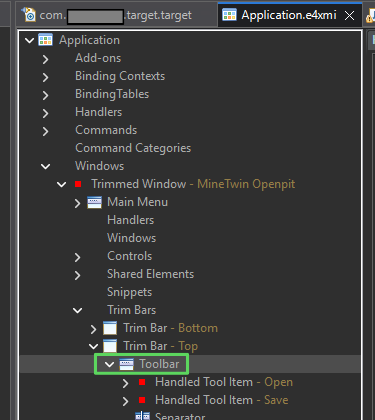
Right-click on the Toolbar instance then Add child > Handled ToolItem to begin adding your new button.
2. Creating the Tool Item
In the properties for this new tool item:
-
In the Label field, add our previous Command name from before
CustomImportBlocks. -
Find the Command field and select the
CustomImportBlockscommand from your command list.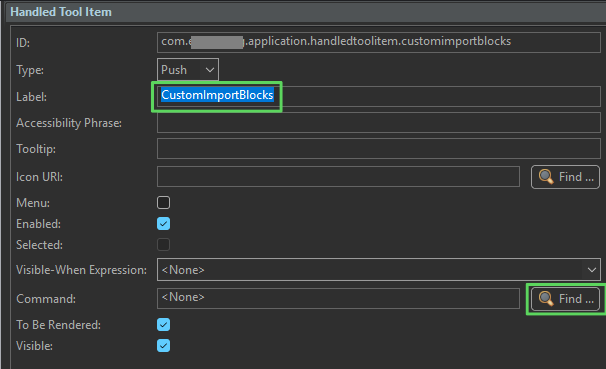
-
Adding an Icon: Visual cues are vital for user experience. You can use any
.pngfile here.
|
There are some default icons in MineTwin. Set the Icon URI path to:
|
3. Running and Testing
Now that the button is bound to your handler, perform a full application test to ensure the lifecycle works as expected.
3.1. Initial State Verification
When you launch the MineTwin application, observe the toolbar immediately.
-
Expected Outcome: The import button should be greyed out (disabled).
-
Why? Because our
@CanExecutelogic requires a scenario to be loaded, and on startup, the active scenario isnull.
3.2. Functional Testing
-
Load a valid scenario into MineTwin. (You can use one of the
Standard Library Scenariosfor this.) -
Observe the button. It should now become active (no longer greyed out).
-
Click the button to trigger your import logic.
-
Validation: Because we have not yet built the UI for parsing the file, check the Eclipse Console view. You should see the file path of your selected Excel file printed there.

|
If you do not see the file path in the console, revisit the |
4. Summary of Workflow
You have now successfully:
-
Declared a command in the model.
-
Implemented the executable logic in a handler class.
-
Bound these together via the E4 UI model.
-
Created a conditional UI trigger (the button) that respects the application state.
This pattern is the standard for extending MineTwin functionality. You can now replicate these steps to add new features or export functionality as needed.