Introduction to Creating Custom Commands & Handlers
This module focuses on the backend logic of the MineTwin application. We will define a new functional command and create the associated handler to manage the execution logic.
1. The E4 Application Blueprint
An E4 Application refers to an Eclipse RCP (Rich Client Platform) application. Building one requires understanding the core UI blueprint before writing the actual executable code.
1.1. The Application.e4xmi File
The Application.e4xmi file is the central configuration file for any Eclipse RCP application. It acts as the primary backbone of the application.
Its main function is to connect user interface elements, such as buttons and menus, to the underlying executable code.
-
Developers use this file to navigate to the Commands section to declare new, abstract actions.
-
It is also the location where new Handlers are created and bound to those commands so that the application knows what Java logic to run when an action is triggered.
2. Defining a New Command
A Command is a declaration. It tells the application that a new action exists, but it does not tell the application how to perform that action.
-
Open the
Application.e4xmifile.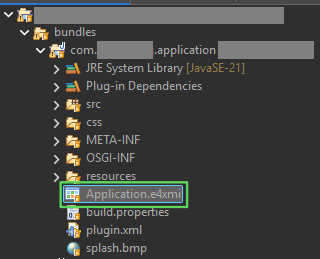
-
Navigate to the Commands section.
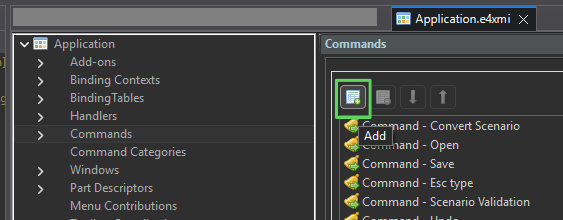
-
Add a new command and name it
CustomImportBlocks. -
Keep the default ID generated by the system, as this acts as the internal identifier.
3. Creating and Linking Handlers
A Command on its own is purely abstract. To give it life, we must bind it to a Handler. A Handler contains the actual Java logic that runs when the command is triggered.
3.1. Handler Setup
-
In the
Application.e4xmimodel, create a new Handler.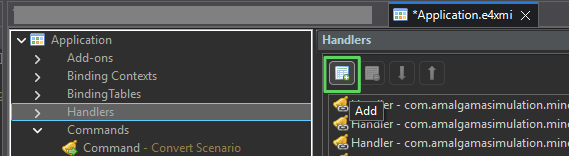
-
Use the "Find Command" feature to locate and select the
CustomImportBlockscommand you just created.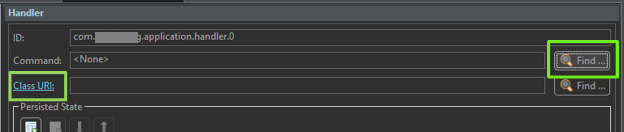
-
Click "Class URI" and provide the following:
-
Class Name:
CustomImportBlocksHandler -
Package: Click "Browse," select
com.eyftraining.application, and then manually append.handlersto the package string.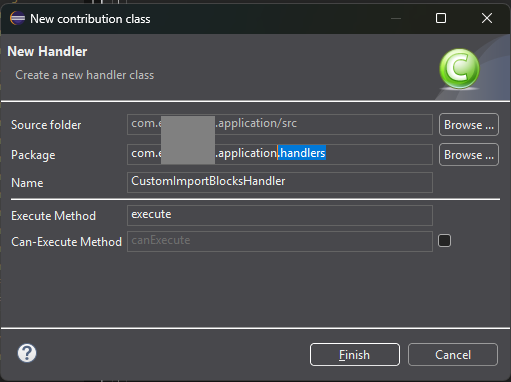
-
3.2. Implementing Handler Logic
Now that the Handler is created, we need to inject the core MineTwin services to handle our data. Open CustomImportBlocksHandler.java and ensure your imports include standard Java utilities and MineTwin framework references:
import java.util.ArrayList;
import java.util.List;

import org.eclipse.e4.core.di.annotations.CanExecute;
import org.eclipse.e4.core.di.annotations.Execute;
import org.eclipse.swt.SWT;
import org.eclipse.swt.widgets.FileDialog;
import org.eclipse.swt.widgets.Shell;

import com.amalgamasimulation.desktop.binding.RedrawRestrictionManager;
import com.amalgamasimulation.emf.commands.CommandsManager;
import com.amalgamasimulation.minetwin.application.utils.AppState;
import com.amalgamasimulation.minetwin.application.utils.IAppData;
import com.amalgamasimulation.minetwin.application.utils.MessageBoxFactory;
import com.amalgamasimulation.minetwin.excel.ExcelFile;
import com.amalgamasimulation.minetwin.openpit.datamodel.openpit.OpenpitScenario;
3.3. Injecting Application Services
We use Dependency Injection (@Inject) to gain access to the scenario data and application state.
|
These dependency injections need to be inside the class, but outside the execution method. |
@Inject
private IAppData appData;

@Inject
protected AppState appState;

@Inject
private RedrawRestrictionManager redrawRestrictionManager;

@CanExecute
private boolean canExecute() {
    // Only allow execution if the app is in Editor perspective
    // and a scenario is actively loaded.
    return appState.isEditorPerspective() && appData.getScenario() != null;
}|
The |
4. Handling File Selection
To finish the handler, we use the @Execute annotation to define the action that occurs when the command is triggered. We will open the system file dialog, allowing the user to select their Excel file for upload.
This involves injecting the active UI Shell and using the FileDialog class to capture the user’s file path.
@Execute
private void execute(Shell shell) {
    // 1. Initialize the FileDialog
    FileDialog dialog = new FileDialog(shell);

    // 2. Set the filter to only allow Excel files
    dialog.setFilterExtensions(new String[]{"*.xlsx", "*.xls"});

    // 3. Open the dialog and capture the selected file path
    String filePath = dialog.open();

    // 4. Verify a file was selected before proceeding
    if (filePath != null) {
        System.out.println("Excel file selected for import: " + filePath);
        // Future logic for parsing the Excel file will be placed here
    }
}