Assess plan feasibility and control equipment
In this section, we continue from the completed first haulage scenario and use studies to check whether the production target is realistic. We will search for an equipment combination that gets as close as possible to the plan, then return to the scenario with the smallest plan deviation and review the limiting parts of the material flow chain.
The key training idea is that equipment selection does not always make the target achievable. When the conveyor and skip hoist become hard constraints, we treat the current target as infeasible, reduce it, and run the selection process again.
After we find a scenario that can meet the adjusted target, we will analyze how the equipment works. We will see that LHDs can start working on the second haulage leg after the stope is mined out, then use mine areas to restrict that behavior. At the end, we will compare the scenarios with and without LHD mine area assignment in scenario comparison mode.
1. Run the first fleet sizing study
In this section, we create the first study from the completed haulage scenario and save the best candidate for further review. The scenario already contains the full material flow chain, so the study can test whether adding equipment is enough to reach the production target.
We start with a fleet sizing study because the question is operational. We want MineTwin to search for equipment combinations and show how close each generated scenario can get to the target. After the study finishes, we keep the generated scenario with the smallest negative deviation from the plan.
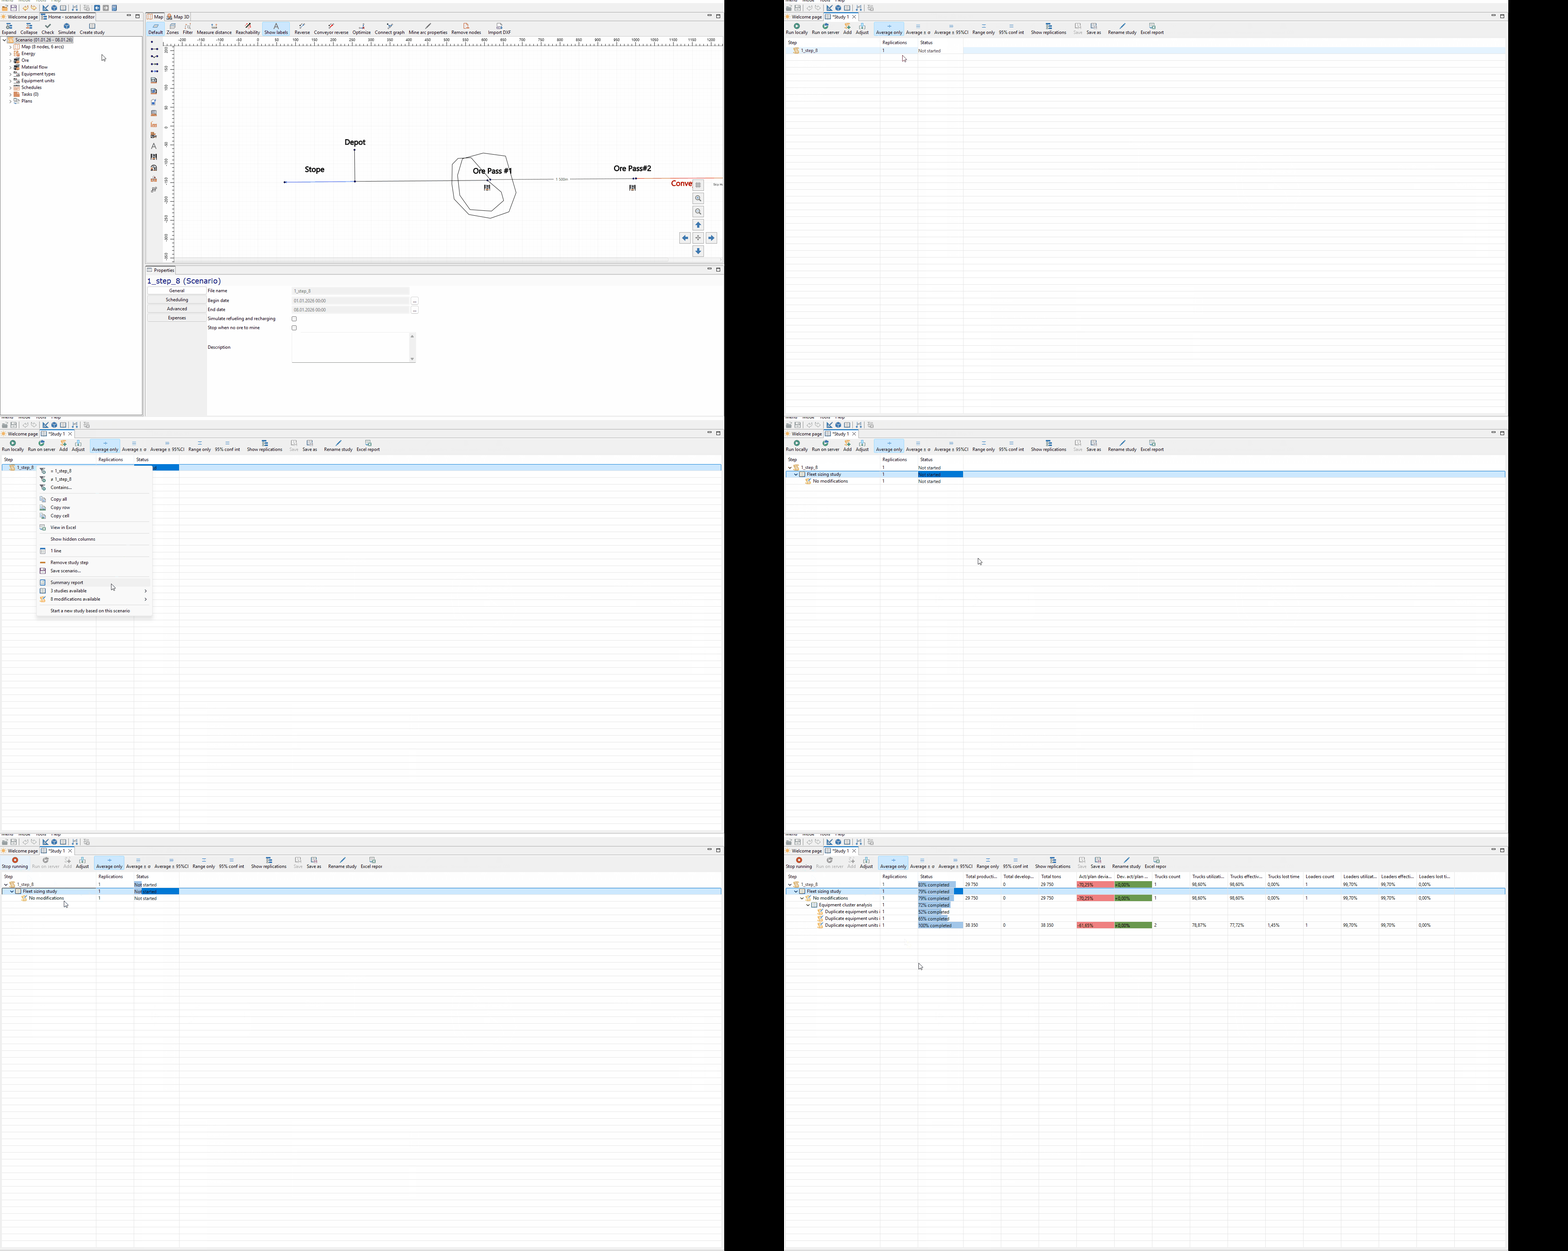
We click Create study from the scenario editor and create a new Fleet sizing study. We name it Fleet sizing 1 and keep the current completed scenario as the base scenario for the study. Then we run the study and wait until MineTwin finishes generating and simulating the candidate scenarios.
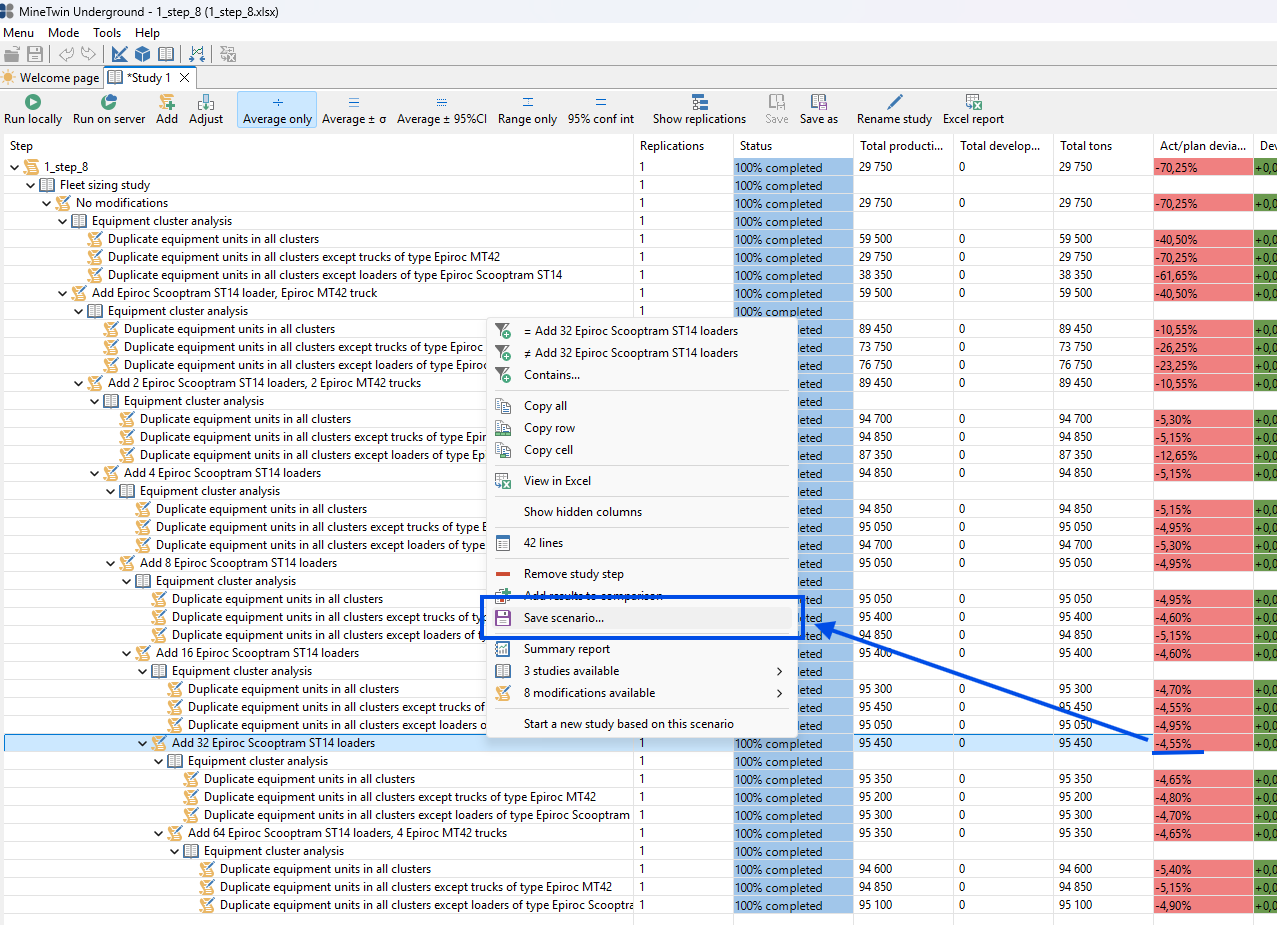
We review the completed study results and look at the Act/plan deviation column. Even after adding equipment, the best candidate still has a negative deviation, so the original plan is not fully met. We select the generated scenario with the smallest negative deviation and use Save scenario… to return it to the scenario editor for detailed analysis.
2. Review the bottleneck in the saved scenario
In this section, we open the scenario saved from the first fleet sizing study and review how the resources are used. The study tried to reduce the plan deviation by adding a large number of loaders, because this produced a better result than adding trucks in the generated candidates.
However, the saved scenario still does not meet the original target. To understand why, we run the scenario and compare the utilization of mobile equipment, conveyor equipment, skip hoisting, and the material buffers.
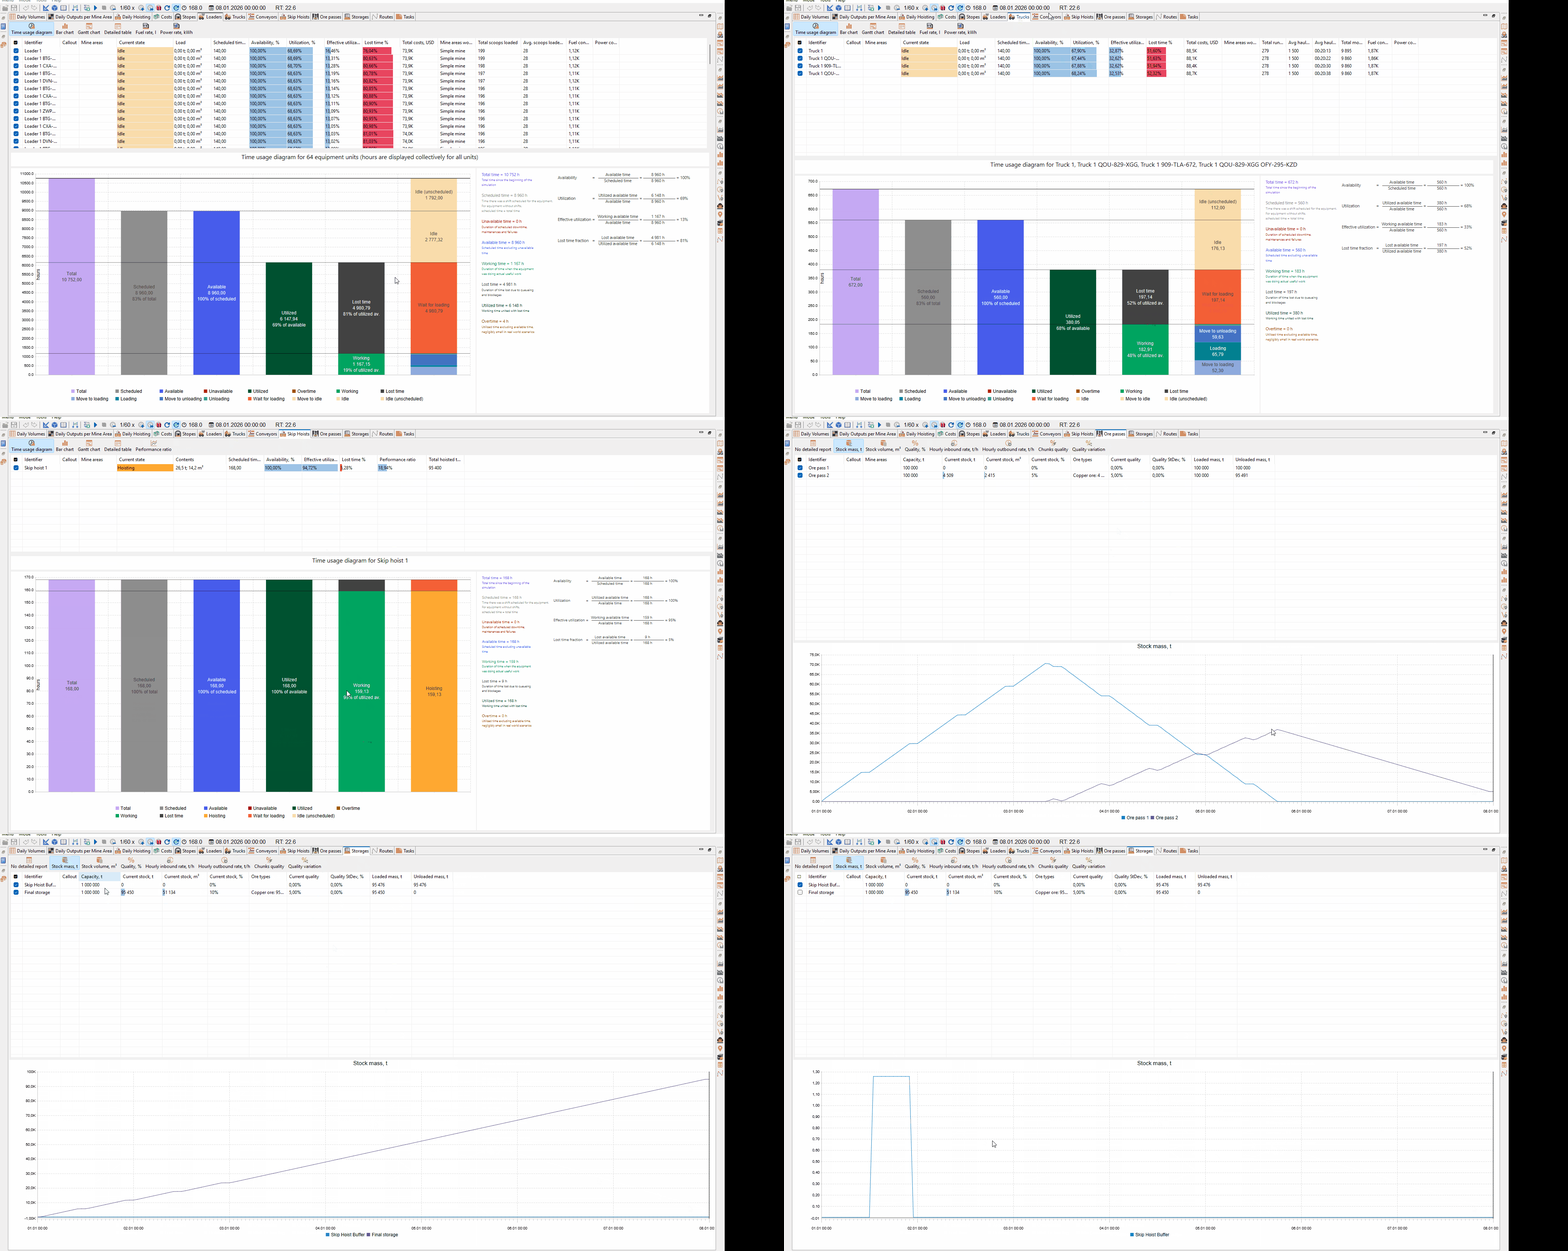
We run the saved scenario and start by reviewing the loader and truck utilization. Even though the study added many loaders, both the LHD fleet and the truck are still strongly underutilized. This tells us that simply adding more mobile equipment is not removing the main restriction in the system.
Then we review the downstream equipment. The conveyor utilization is close to 95%, and the skip hoist utilization follows the conveyor utilization. This indicates that the conveyor is the bottleneck that limits the flow into the skip hoist.
The material buffers confirm the same conclusion. Untransported ore remains in the buffer before the conveyor, Ore pass 2, while the buffer before the skip hoist is empty. The downstream chain is waiting for material after the conveyor, so the original production target is constrained by the conveyor capacity rather than by the number of loaders or trucks.
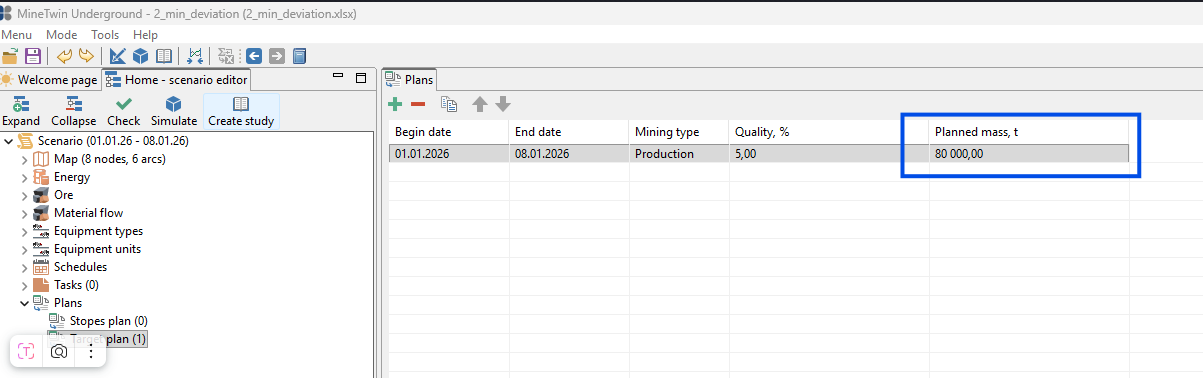
We treat the conveyor capacity as a hard constraint that we cannot change in this training scenario. Because the best study candidate still cannot reach the original plan, we mark that plan as unrealistic for the current material flow chain. We make this change in the original scenario, before the study-added loaders are saved into the model. We reduce the production target to 80,000 t, keeping a small margin below the achievable values observed in the study results. This gives us a realistic target for the next fleet sizing study.
3. Run fleet sizing for the corrected target
In this section, we run fleet sizing again after reducing the production target to a realistic level. The conveyor remains the hard downstream constraint, so the study now searches for an equipment combination that can meet the corrected plan instead of trying to force the original target.
We use the corrected scenario as the base scenario for the new study. Then we review the generated alternatives and save the best scenario that meets the plan.
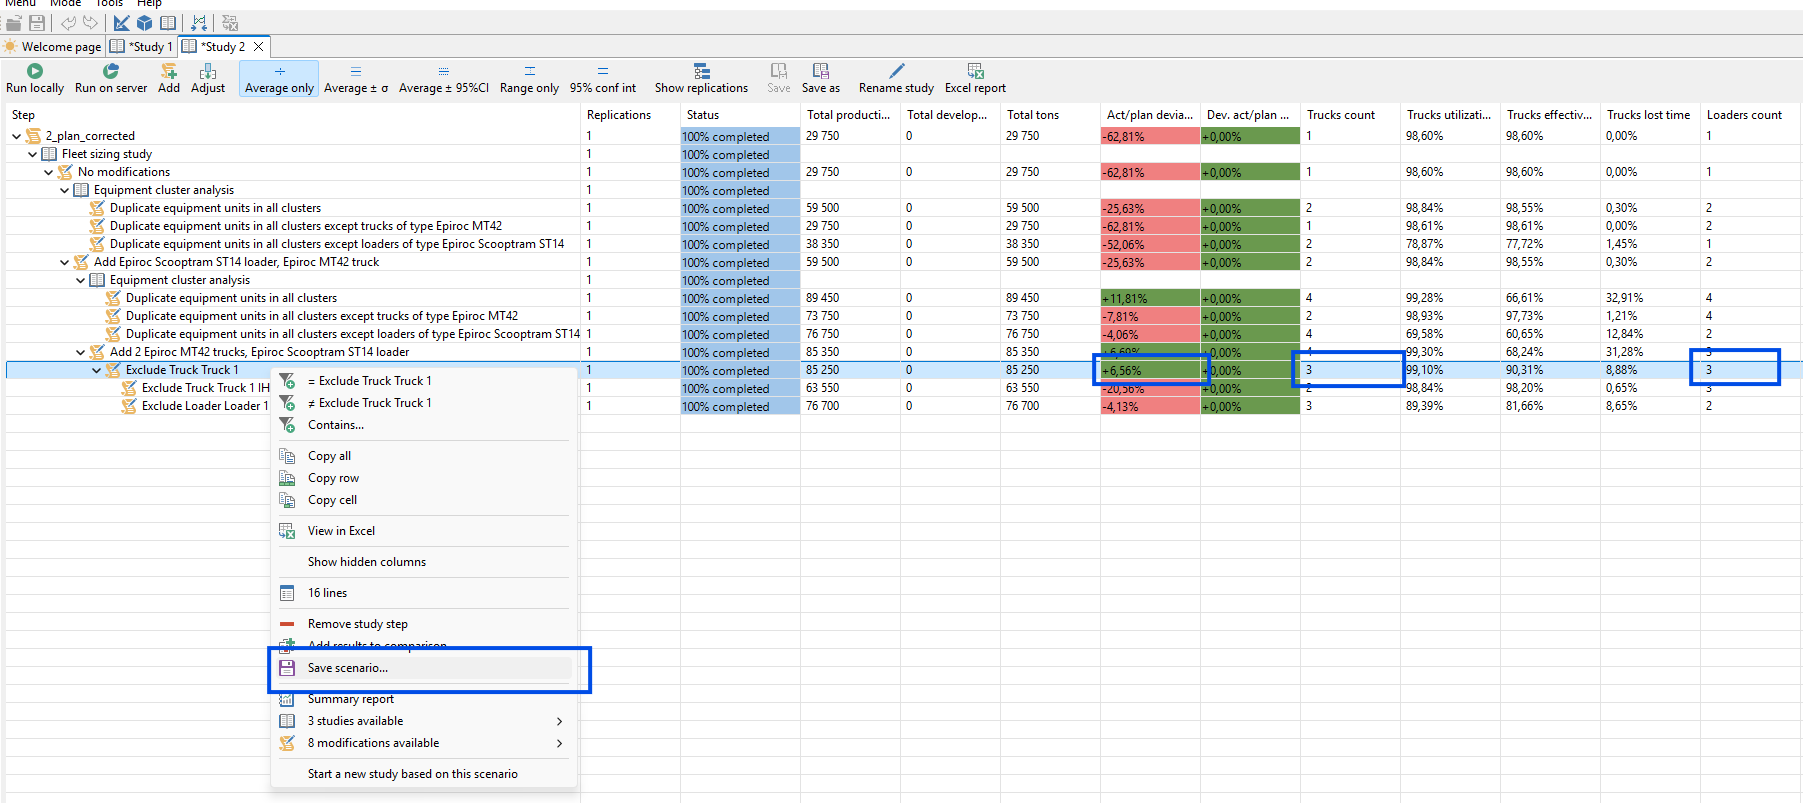
We run the fleet sizing study again and review the completed results. With the corrected target, MineTwin finds a scenario that fulfills the production plan. The selected candidate uses 3 Epiroc Scooptram ST14 loaders and 3 Epiroc MT42 trucks. We save this generated scenario so we can return to the scenario editor and analyze how the selected equipment works during the simulation.
4. Review the optimized scenario schedule
In this section, we run the scenario saved from the corrected fleet sizing study. The plan is now achievable, so we can move from feasibility checking to reviewing how the selected equipment behaves.
The first schedule review focuses on the loaders. We want to confirm not only that the target is met, but also that the equipment is working in a reasonable way.
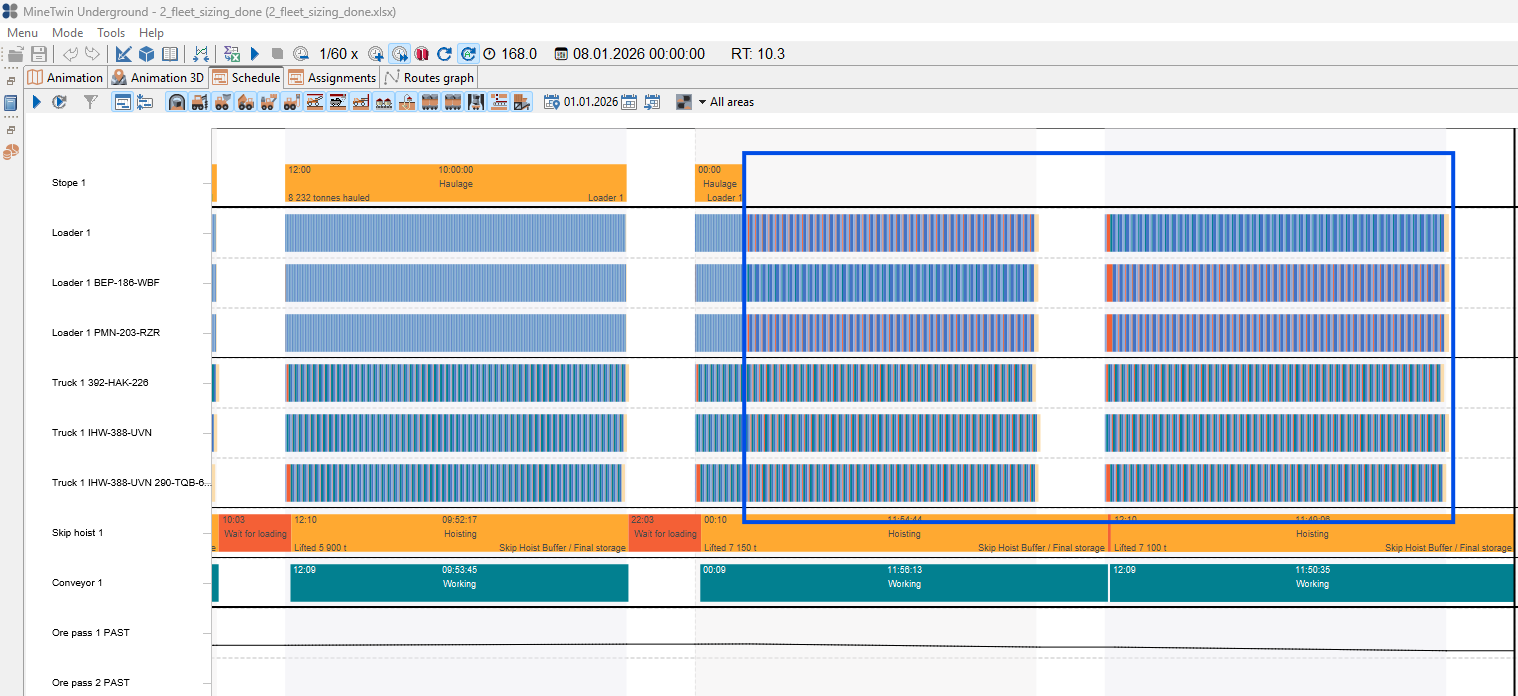
We run the optimized scenario and open the schedule view. Near the end of the simulation, the stope no longer needs ore haulage, but the loaders continue receiving work. The loader pattern on the Gantt chart changes noticeably after this point. We will inspect this behavior in more detail, because it may indicate that loaders are being dispatched to work outside the haulage leg where we expect them to operate.
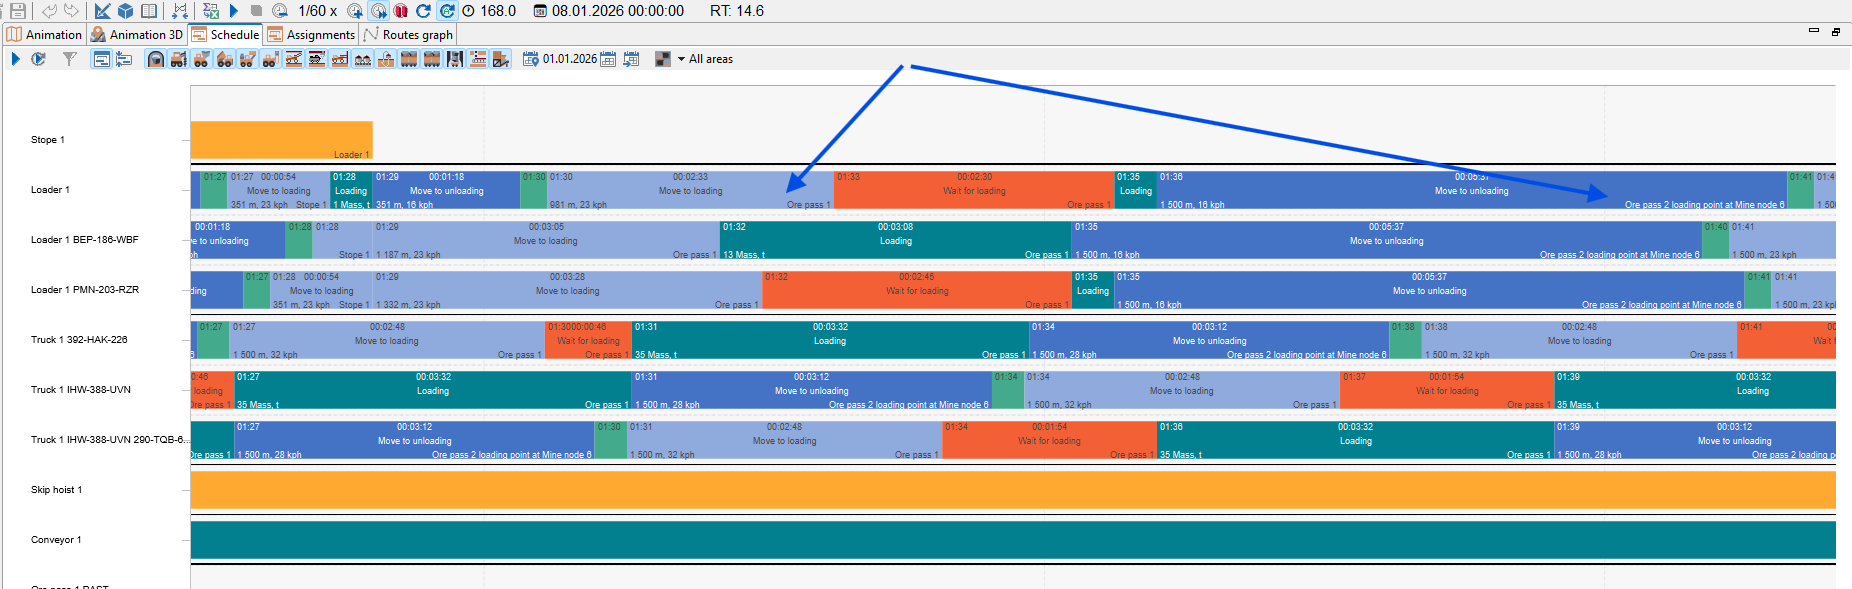
We zoom into the Gantt chart and review the loader tasks after all ore has been hauled from the stope. At this point, the LHDs move to the second haulage leg and start hauling material between Ore pass 1 and Ore pass 2. We do not want this behavior in the training scenario, because using LHDs over this long haulage distance is not economically reasonable. The next question is whether the plan will still be fulfilled if we prevent loaders from working on the second haulage leg.
5. Restrict loaders with mine areas
In this section, we prepare mine areas so that we can control where the loaders are allowed to work. We want the LHDs to stay on the first haulage leg, while trucks remain responsible for the long transfer between the two ore passes.
MineTwin uses mine areas for these equipment restrictions.

We rename the existing mine area to Simple mine leg 1. Then we add a second mine area named Simple mine leg 2. These two mine areas will let us separate the short stope-to-ore-pass haulage leg from the long ore-pass-to-ore-pass haulage leg.
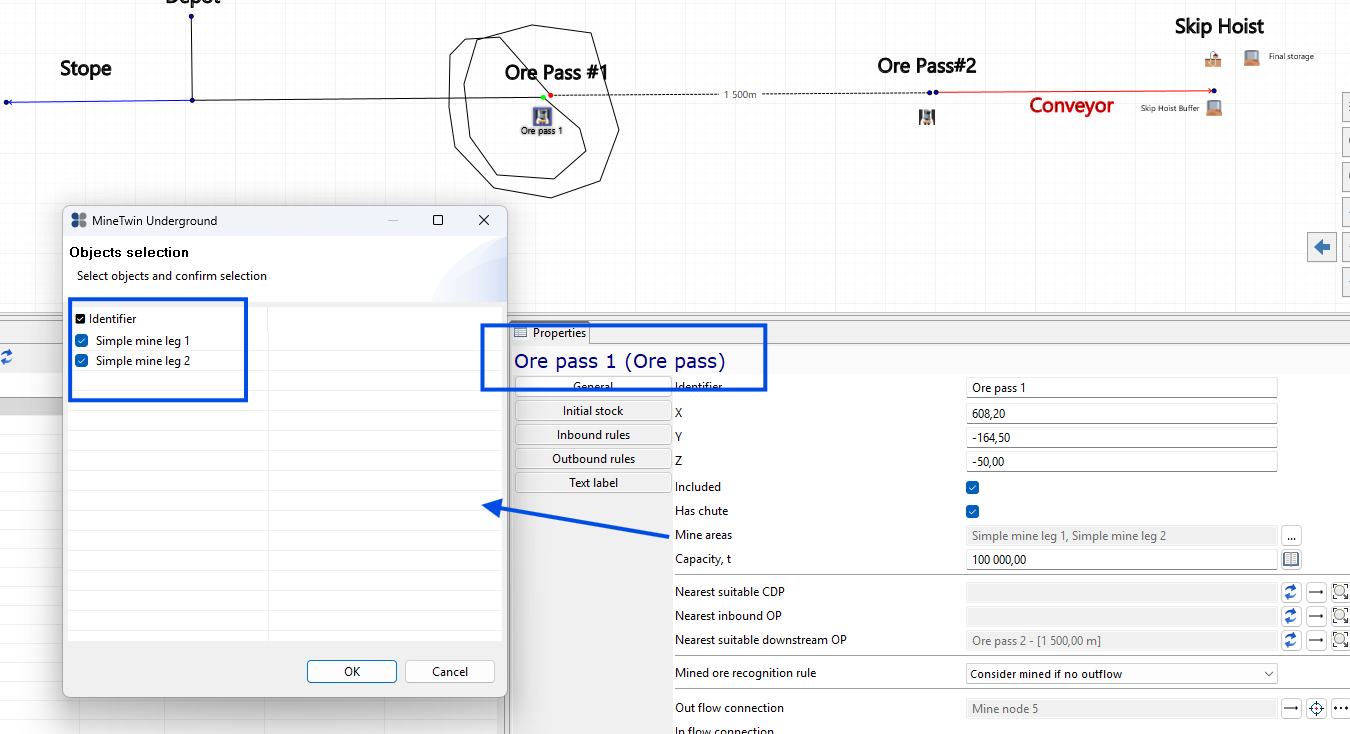
We select Ore pass 1 and assign both Simple mine leg 1 and Simple mine leg 2 to it. The first ore pass is located at the boundary between the two haulage legs. Because it belongs to both sides of the transfer point, both mine areas must be available for this object.
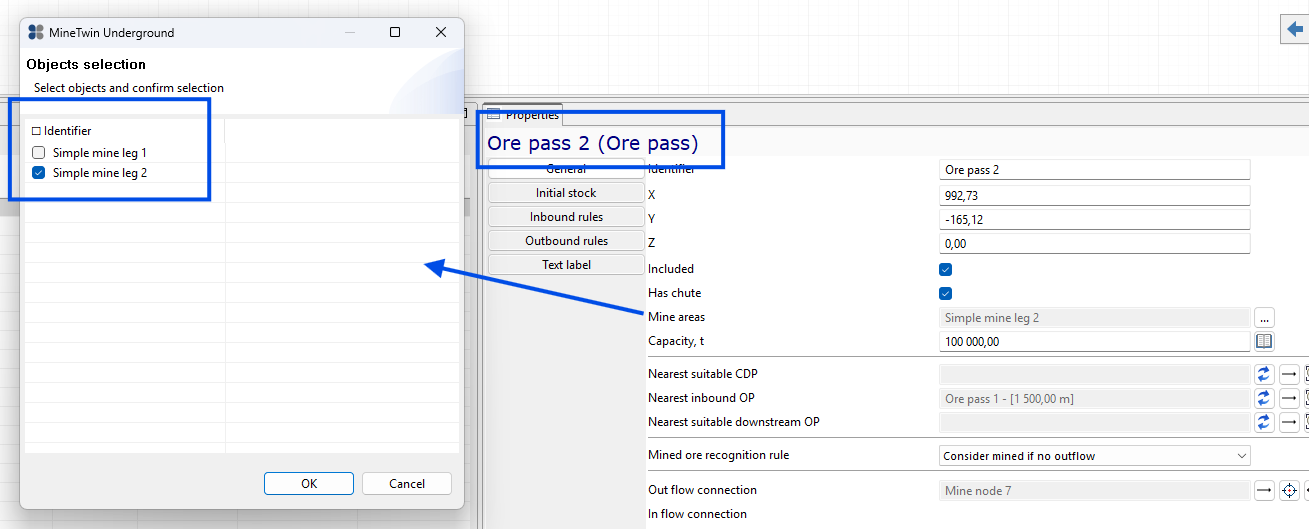
We select Ore pass 2 and assign only Simple mine leg 2 to it. The second ore pass belongs to the long transfer leg, so it should not be part of the first loader haulage area.

We also check the mine segment assigned to Stope 1. Its mine area is already Simple mine leg 1 because the segment belonged to the original mine area before we renamed it. This confirms that the stope side of the model remains assigned to the first haulage leg.
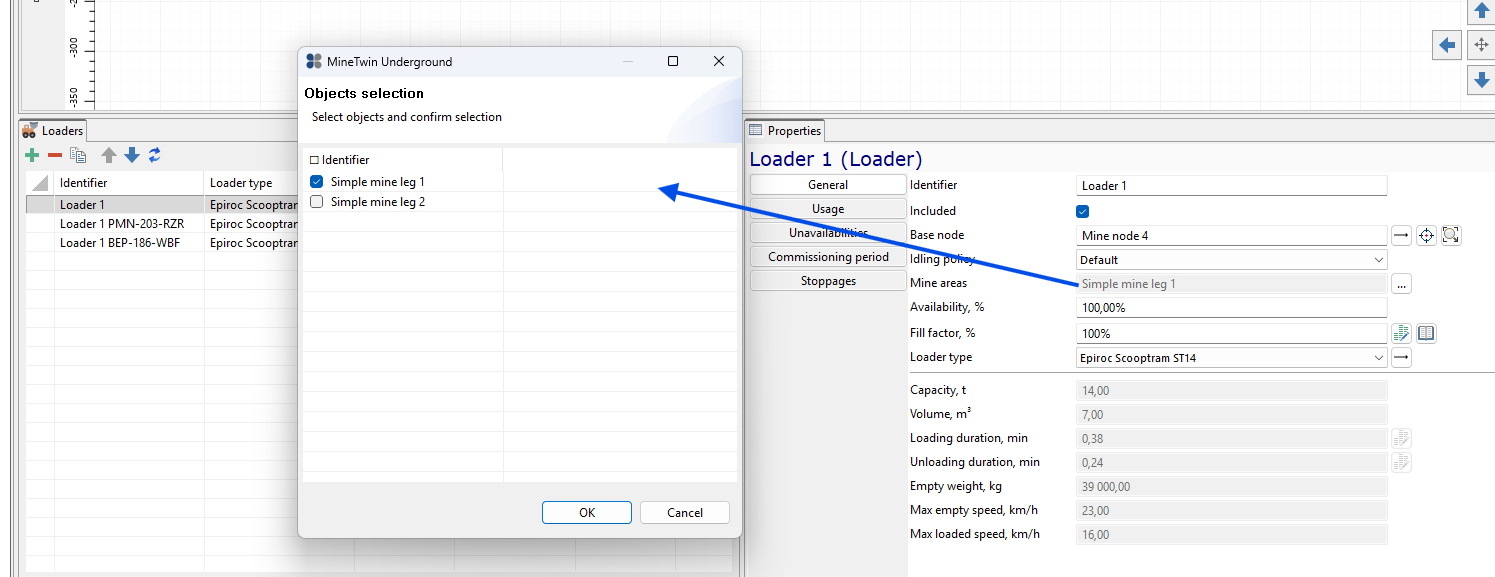
We open the loader units and select one of the LHDs. For this loader, we assign only Simple mine leg 1 in the Mine areas field. This restricts the loader to the first haulage leg, so it can work between the stope and Ore pass 1 but should not be dispatched to the second haulage leg.
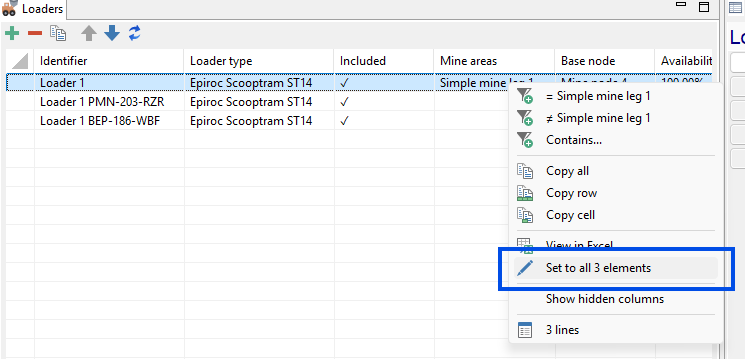
We right-click the Mine areas field for the first loader and use the fill command from the context menu. The Set to all 3 elements command copies Simple mine leg 1 to all three loader units. After this, every LHD is restricted to the first mine area.
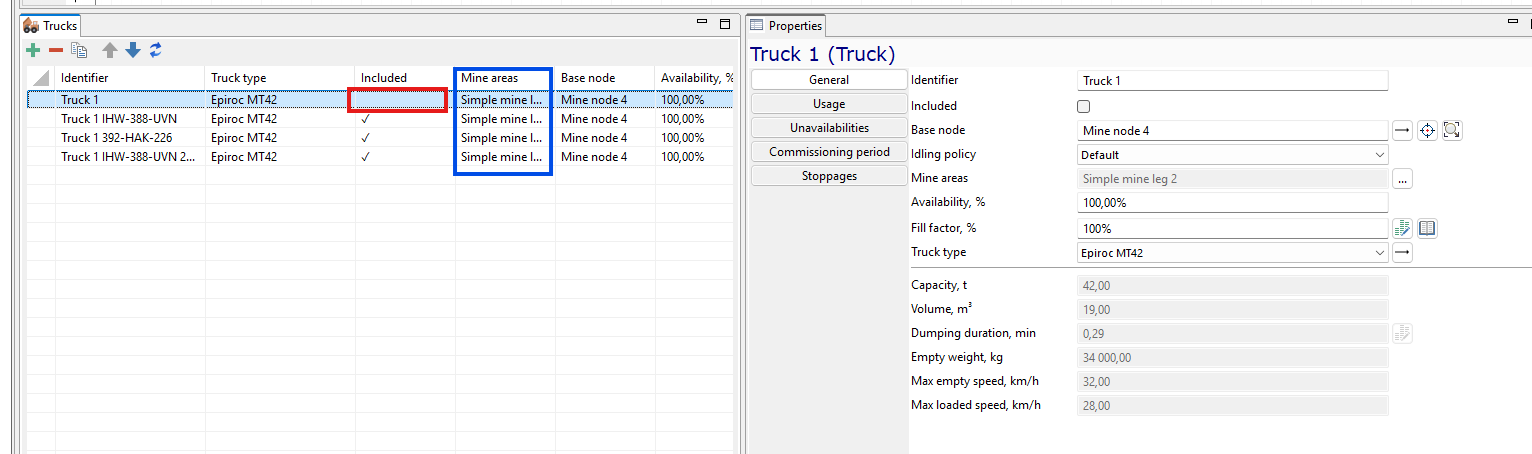
We apply the same idea to the truck units and assign Simple mine leg 2 to them. This keeps trucks responsible for the long haulage leg between Ore pass 1 and Ore pass 2. In the truck list, we see four truck rows even though only three trucks work in the scenario. The truck without the Included flag does not participate in the simulation. It remains in the scenario because the fleet sizing study removes equipment during exclusion tests by clearing Included instead of physically deleting the unit. If needed, we can delete this truck manually, but it does not affect the simulation results while it is not included.
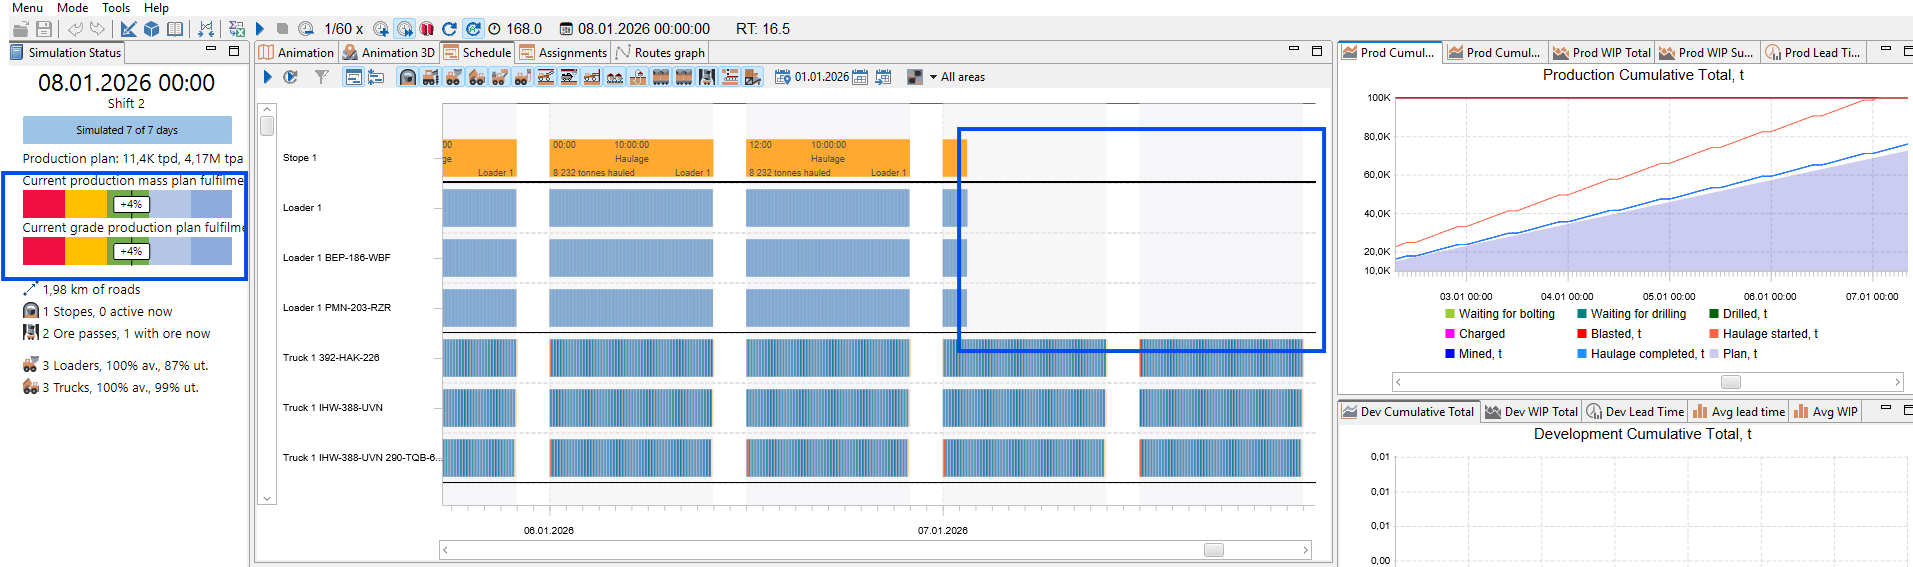
We run the scenario again after assigning mine areas to the loaders and trucks. After the stope has no ore left to haul, the LHDs stop receiving tasks instead of moving to the second haulage leg. The trucks continue working on the long transfer leg, and the production plan is still fulfilled. This confirms that the mine area restriction removes the unwanted LHD behavior without making the corrected target infeasible.
6. Compare scenarios with and without LHD restriction
In this section, we compare the scenario with LHD mine area restriction against the earlier optimized scenario without that restriction. The goal is to check whether restricting LHDs to the first haulage leg improves the operating result while keeping the plan fulfilled.
We save the restricted scenario under a new name and then create a study for comparison. Then we add the scenario after fleet sizing without LHD restriction, run the simulations, and add both scenarios to the comparison report.
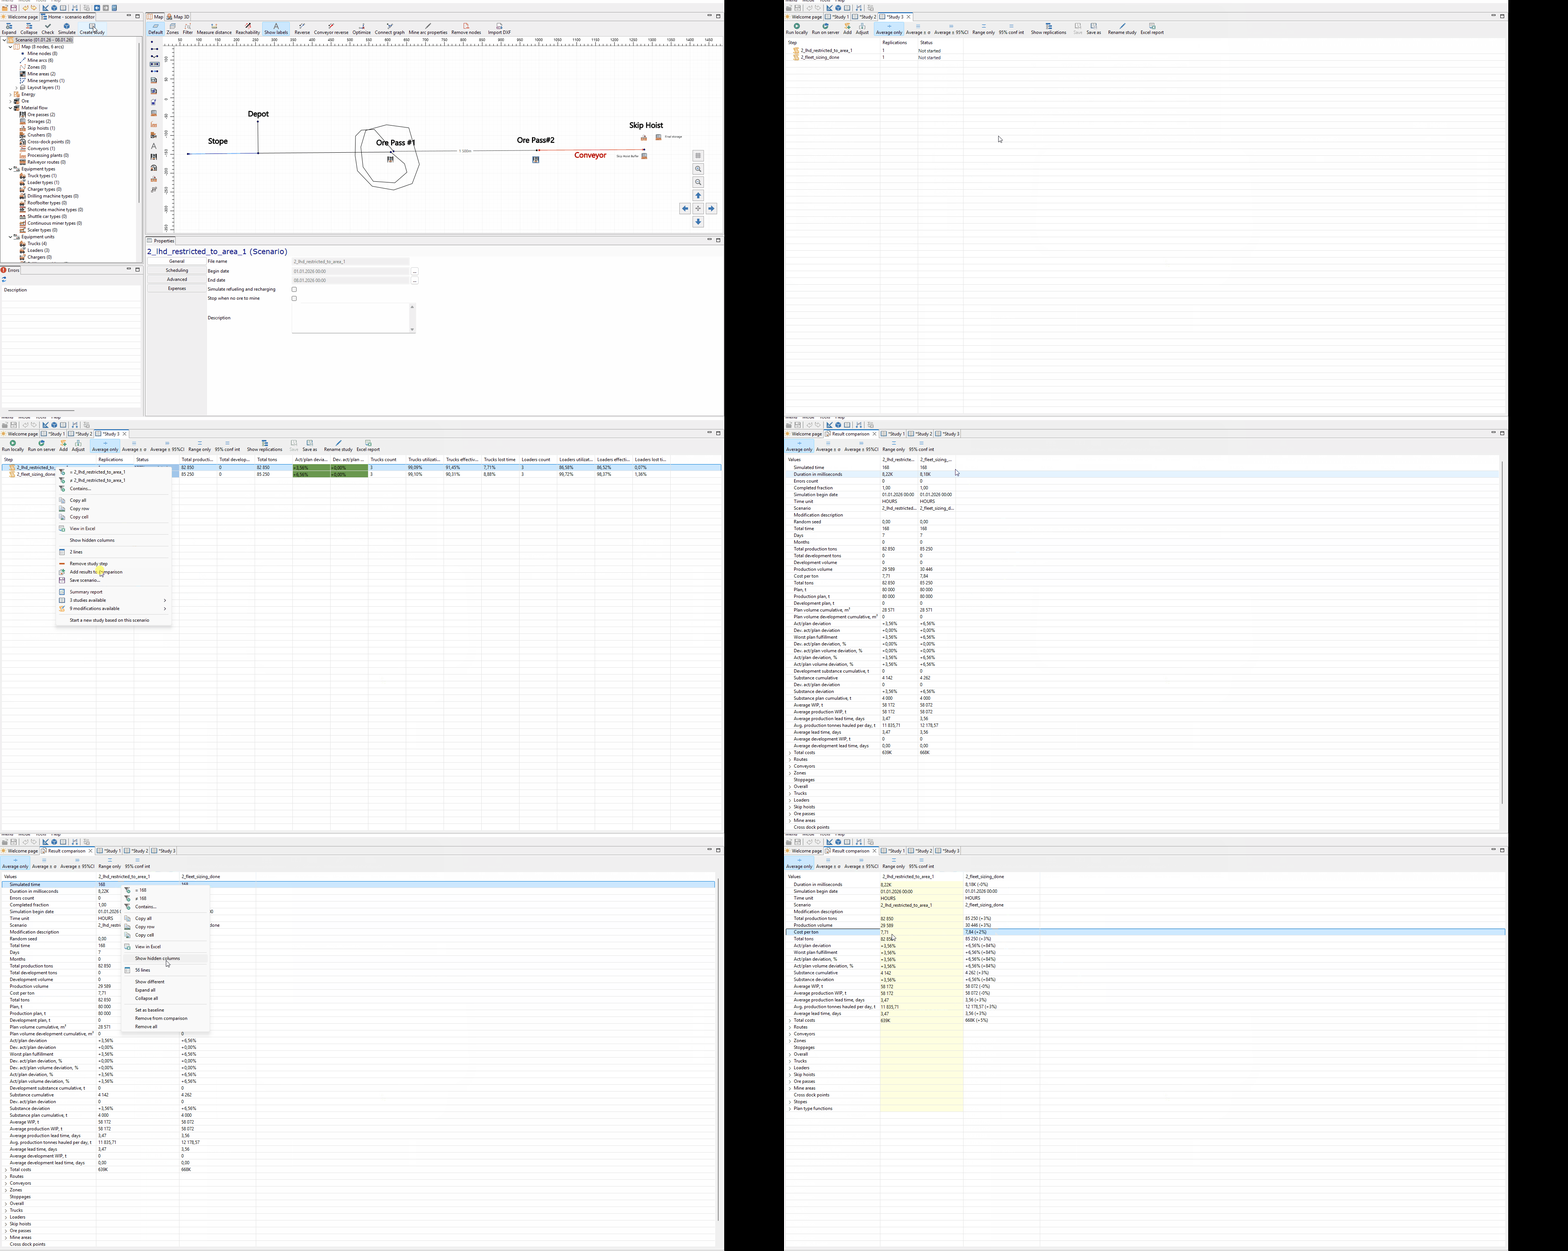
We save the current scenario with LHDs restricted to Simple mine leg 1. Then we create a study and add the earlier scenario where LHDs were not restricted and could work on the second haulage leg. After running the simulations, we add both scenarios to the comparison.
We make the restricted scenario the base scenario for comparison and show only the indicators that differ between the two scenarios. In the scenario without LHD restriction, Cost per ton is about 2% higher. This confirms our hypothesis that sending LHDs over the long second haulage leg is economically inefficient for this operating setup.